'Barbarism is the natural state of mankind,' the borderer said, still staring somberly at the Cimmerian. 'Civilization is unnatural. It is a whim of circumstance. And barbarism must always ultimately triumph.'

-Robert E. Howard
Beyond The Black River

Corrupt Cliffs

Corrupt Cliffs
Get your FREE Narrative Terrain Deck today!
Showing posts with label AAR. Show all posts

Tuesday, July 25, 2017

15mm GRUNTZ AAR: RESD vs DROIDS

Last week we set out to spend the afternoon playing 15mm wargames.  Specifically we wanted to finally give Gruntz a try and see how it worked, following Gruntz we played the essentially same game with the Tomorrow's War rule set. 

We were both familiar with TW, although neither of us had played in awhile, and although I didn't choose to chronicle that game, I did try and chronicle the Gruntz game so I could give an AAR on it.

If you are unfamiliar with Gruntz it is a 2d6 based system.  Basic ranged combat is based on the stats, SHOOT, GUARD, DAMAGE and SOAK.   Basically 2d6+SHOOT needs to beat GUARD to hit and 2d6+ DAMAGE needs to beat SOAK to damage.  Rotten Lead Games has a fairly comprehensive playlist on how the game works: Rotten Lead Gruntz Videos.

In general we liked Gruntz.  It was easy to play, resolved fast enough and was easy to pick up.  It has a built in points system that allows you to easily build comparable forces, although it is not without issues.  I stated up my power armor suits as "Specialists" for about 37 points.  After the game we decided for 37 points if they were stated as "Mechs" I could have had a far more useful unit for the same 37 points.

For those interested I did an AAR video for this battle for the companion YouTube channel. Colony Report

SCENARIO:
Kill 'Em All:  Head to head, elimination scenario.

FORCES:
RESD:
1 Commander
3 Death Guard power suits
3 squads with heavy plasma
1 Mongoose Missile Tank


Droids:
1 Commander
1 Droid Soldier Squad w/plasma
1 Droid Solider Squad w/missile
3 Droid Scout Drone Squad
1 Droid Hunter Killer
1 Hex Droid w/ plasma
1 Hex Droid w/ Gatling Laser

BATTLEFIELD:
Small Colony complex
Colony Complex
DEPLOYMENT:
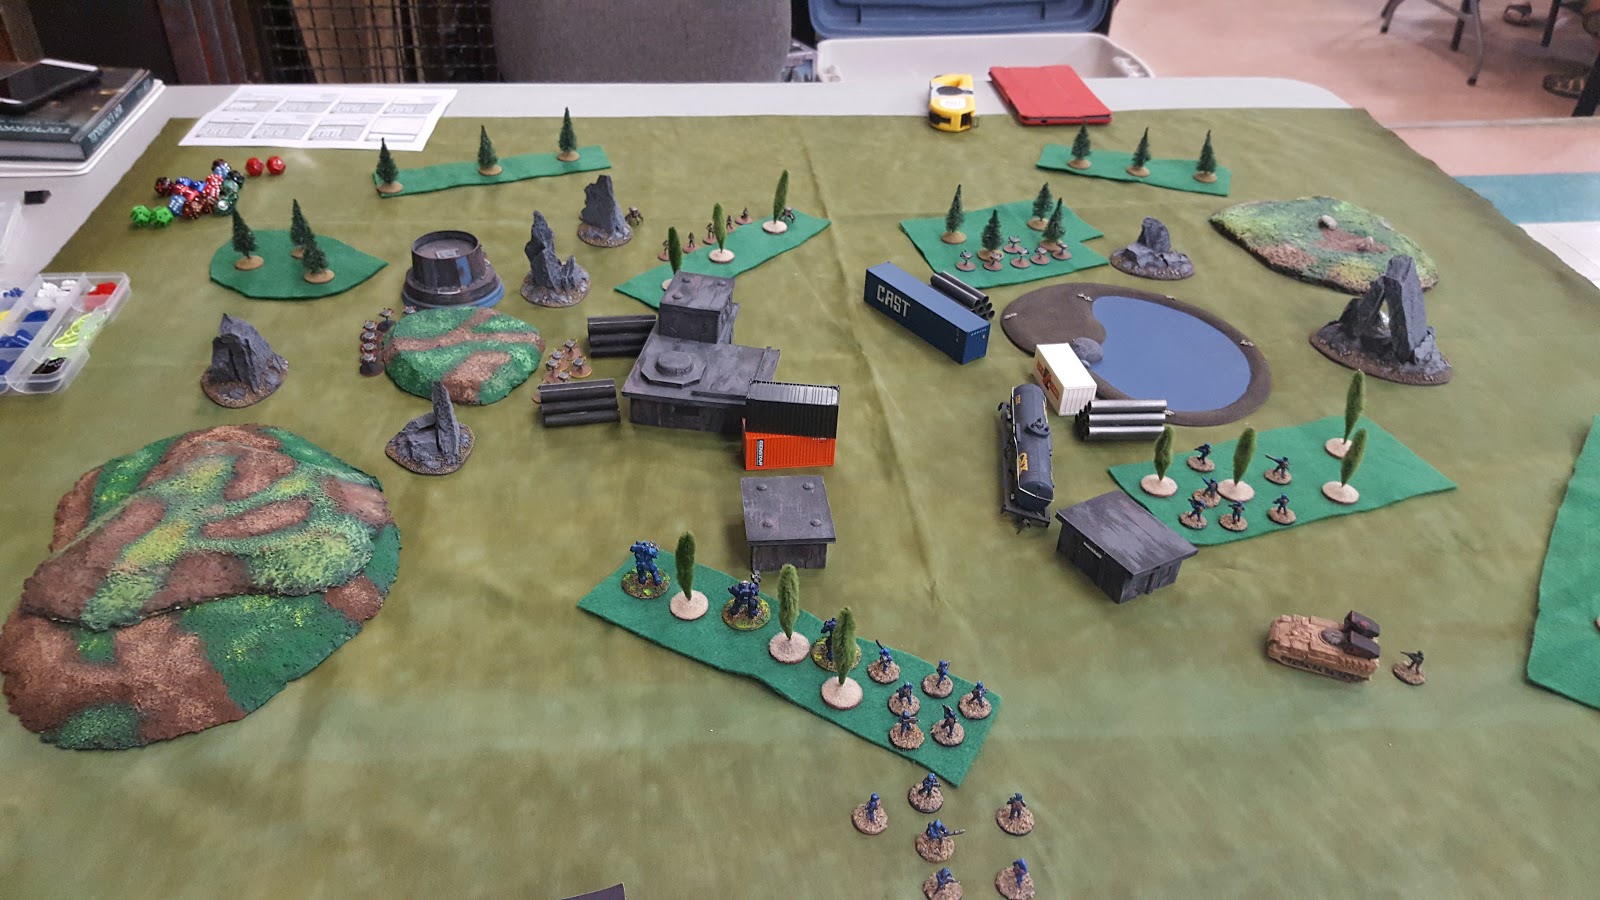
Rolling for initiative the RESD (myself) gain the upper hand and elect to deploy second.
Final deployment of all troops prior to Turn 1.

TURN 1: (RESD wins initiative)
RESD
Forces advance further into position.

DROIDS
Forces advance further into position.
Droid and RESD move further into position.
TURN 2: (RESD wins initiative)
RESD
Units move up into the tree lines on both sides of the base in response to the droid advance.
Mongoose tank moves up to building corner to cover the main base road.

DROIDS
Move up along pond and fire at exposed troopers, scoring no hits on the unit.
Droid Hunter Killer flanks on the right and opens fire on the light Mongoose tank, range and the chaos of the battle field result in no hits being scored.
Further advance and reorganization of troops in cover positions.
HK flanking in on my right side.


Turn 3: (RESD wins initiative)
RESD
Tank swivels and looses a barrage of missiles at the Hunter Killer unit, missing.
On the left side, the power armored Death Guard open up with their plasma on the incoming droids and miss the small nimble hover drones.
Plasma Squad moves back and prepares to fire on HK unit as well.
Plasma Squad moves up taking cover against the southern building.

DROIDS
Hex Droid at long range opens up with a gatling laser against the tank, it’s lasers pinging harmlessly off the armor of the tank.
Second Hex Droid moves up unleashing the hell fire of plasma against the tank, it’s super heated charge melting into the tank, but causing only minor damage
Hunter Killer drops down increasing range between it and the RESD plasma squad and fires on the tank, missing again, but it’s massive burst catches the squad of plasma troopers within it’s hellfire, knocking a man to the ground.
Droid Soldiers move up into a position in and on the main colony building.
The Drones moving down on the middle, maneuver and fire into the squad of men hunkered beside the southern building, knocking a man to the ground.
Mid Turn as the Droids advance on the RESD.

Droids drop the first RESD trooper.


Turn 4: (DROIDS win initiative)
DROIDS
The Hunter Killer fires against the tank missing as well as missing with weapon's area blast.
Plasma armed Hex Droid opens up on the tank again, again breaching the armor, but causing no critical damage.
Gatling Hex Droid fires on a squad of RESD troopers knocking 2 men to the ground.
Drones come down the middle and scores no hits on the plasma squad.
Drones fire on the Death Guard taking cover in the forest, scoring no hits.
Second unit of Drone Scouts fire on the Death Guard scoring 1 hit, resulting in minor damage.
Droid Soldiers fire shoulder mounted rockets at DG causing 3 damage.
Droid Soldiers miss with their rifles.

RESD
Mongoose swivels and closes with the HK before unleashing a barrage of rockets against the HK, causing massive damage but failing to drop it.
The RESD Commander turns and fires an expertly placed shot with his plasma rifle scoring a hit and crashing the HK to the ground.
RESD Plasma squad on the left side fires and misses Drones.
Death Guard open fire, their plasma finding one drone.
RESD Troopers move up from building cover to try and close distance on Drone Scouts and Hex Droids.
RESD Plasma on right, moves left using the south eastern building as cover.
Thick of the battle as troops move, fire and try and hold their position.
Combined damage from the Mongoose and Commander destroy
the Hunter Killer.


Turn 5: (RESD wins initiative)
RESD
RESD Plasma squad on the left moves up scoring one hit on the left unit of Scout Drones.
Death Guard opens fire scoring 1 hit on a second unit of Scout Drones, destroying one and suppressing the unit.
RESD Plasma squad in the middles misses.
The Mongoose tank fires it's missiles against the Plasma Hex Droid missing it.
Commander moves up.
The Plasma Squad on the right continues it's advance

DROIDS
Commander removes suppression on drone unit.
Droid Soldiers move up and fire on the RESD Plasma Squad suppressing it with 2 hits.
Droid Soliders fire their heavy weapon against the Death Guard failing to penetrate it's armor and having no effect.
Scout Drones move and fire against RESD Plasma Squad causing 2 hits and suppressing the squad.
Drones fire on the Death Guard causing no hits.
Hex droids, both gatling and plasma fire on the Mongoose, but fail to hit and penetrate it's armor.
Down the middle of the Colony the Scout drones fire on the remaining RESD Plasma scoring 5 hits on the remaining squad, wiping it out.
Left side: Scouts and Soliders exchange fire with Death Guard and Plasma troops.
Tank firing on Hex while Troops
advance.
Droids wipe out middle RESD team and cause casualties on left RESD Team.
Turn 6: (DROIDS win initiative)
DROIDS
Scout drones coming down the middle fire on the RESD Commander, their shots impacting harmlessly against his armor.
Gatling Hex Droid, fire on full auto against the remaining RESD Plasma, knocking down 3 men, suppressing them.
The Plasma Hex Droid opens up with it's heavy plasma, striking the tank and causing it to finally explode into a shower of molten and twisted metal.
Remaining troops, Soldiers and Scouts, on the left open up against the Death Guard. They cause an additional wound, but the Guard holds strong, but it is only a matter of time.....

RESD
Commander moves and shoots, no damage.
Plasma Squad moves and shoots hoping for a lucky shot against one of the Hex droids, but fails.
The Death Guard, still a lethal force, fire their heavy plasma against the Soldiers dropping 3.
Mongoose is destroyed, middle RESD troopers down.
Death Guard holding, majority of RESD wiped out.  Colony is lost.
We called the game in favor of the DROIDS after the completion of the 6th turn. The only units I had left that were at all effective against the DROIDS were the Death Guard and they would start falling in the next round or so.

Saturday, December 10, 2016

The Tomb of Fehim Khan, play through: Part 1.

I ran the first part of the adventure tonight. It ended up taking a little longer than we had, but the players all stayed an extra hour to get further into it. I will take that as a win.

The Thea, Celemont, Tolmos, and Tibus all came to know each other sitting in a tavern on the norther segment of Agruphur, sharing stories of past exploits and simply not being Turanin.  After hearing the name of a local Turanin boogey man they set out to find the local hermit who might know something. On the way to the Hermit the party was attacked by a mob of hyenas which they quickly dispatched.

Hyenas attack!
Once they had finished off the hyenas they made there way to the hermit who would not come out of his hut and kept yelling for the players to go away. They finally did, but not before learning that the Tomb was indeed in the area and nearby on the top of a large mountain in the area. The players arrived at the base of the mountain at dusk and chose to camp out, this went by without incident and they were able to find a quick way up the mountain.
Camped at the base of the mountain.

At the top of the mountain in a clearing the came across an ancient oblesik. After searching it and applying lore they determined the carvings were Stygian, or at least proto-stygian, probably from before a time there was a Stygia. Just past this obelisk was a cave.....in short order that were faced with a cave lion!
Attacked by a cave lion.

Death of the cave lion.
After some minor exploration and the removal of the lion pelt, and hiding of the corpse to prevent wild animals from being attracted to the area, they tied of their horses and made their way into the cavern. After a short distance they found a shaft leading down further, and after a short climb found themselves in a short corridor opening into a long room. Either side lined with armed skeleton statues.
The first corridor.
Predictably when investigated the skeletons drew steel and attacked the party. Apart from a few minor injuries the skeletons were defeated and our heros moved on to the next corridor of the tomb. This next room had a vaulted ceiling a few doors out of it and was lined with columns.

The columned chamber
Finding nothing of interest they moved through the door and found a room full of crates! Treasure! In his haste Celemont entered the room and barely avoided a spear dropping from the ceiling. Despite the dangers of this room they found little of interest here.

The annex

Finally they moved down the long hallway at the end of the columned hall and opened the door. They found a long room here, either side flanked by stone coffins and set against the far wall on a dais on ornate sarcophagus. After investigating and trying to open the smaller coffins and failing the party advanced and upon trying to open one of the coffins closer to the sarcophagus, they were confronted with a scraping as it opened and Fehím Khan stepped out and admonished them for coming to his tomb, he then called forth his mummy guards and attacked!

Entering the tomb chamber.
This ended up going poorly for Fehím Khan, quickly Celemont drew steel and attacked him, meanwhile Thea and Tolmos dropped back and fired arrows, and finally dispatching 2 mummies. Tibus throwing an orb of exploding fire damage one mummy and lit it on fire. Finally Celemont turned and dispatched the remaining mummies. After searching the bodies they found an amulet around Fehím Khan's neck which Celemont took.........
The death of Fehím Khan
To be continued......

Monday, November 28, 2016

Hither Came Conan. Monolith's Conan Boardgame.

After much anticipation and waiting Conan has finally come to trod my home under his sandaled feet.  This weekend there was gigantic mirth as I rolled out my first games of Conan with some of my friends. 

We played two of the scenarios: In the Clutches of the Picts and Hunting the Tigress.  We had a few growing pains in the first scenario, but were off to a roaring start by the second.  In retrospect part of the issue is Monolith referring to a model as a unit.

My brain sees 3 guys moving together as a unit.  They see it as 3 units in a group.  Other than that most of it was simply looking a few things up and then heroic killing and rescuing.


IN THE CLUTCHES OF THE PICS


Hadrathus opens the hut door and unleashes a lightning storm into the hut killing the 3 Picts inside.  Conan and Belit advance and Shevatas advances and unleashes hell with his throwing knives. 
The giant snake slithers out of the hut and attempts to end Conan and fails horribly, likewise the Pict hunter also fails to damage Conan.  In one fell slash of Conan's sword the snake falls lifeless.  Belit moves in and kills the Picts inside the hut.  Hadrathus and Belit open the chests in their rooms acquiring treasures
Hyenas race out and attack Hadarthus and inflict a grevious wound before being cut down by Shevatas.  More Picts erupt from the huts to kill the Heros.
Hadrathus and Conan move into the Snake hut to find the unconscious Princess.  Shevatas is confronted by Zogar Sag and a Pict.
Conan drops most of his equipment, picks up the unconscious Princess and makes his escape.  Belit and Shevatas make short work of Zogar Sag and his Pict guard, but with his last force of will Zogar summons 4 more hyenas that burst out of the forest to attack Belit and Shevatas.  It is too little too late though, with Zogar's head already in the possession of Shevatas, he easily flees the field with the head.

Our Heros are victorious.

Monday, March 7, 2016

Song Of Blades and Heros: Skirmish club

This past Saturday the new Skirmish Gaming Club at the local games store (Sentry Box) had it's first official games.

We played a few games here and there to learn the rules earlier but this was the first official game day.

During the day the various members got in a 3 way battle, a 2 way battle and a 4 way battle.


Orcs vs Chaos Dwarves vs Goblins/Minotaurs
Elves vs Halflings
Orca vs Elves vs Halfings vs Chaos Dwarves


What follows is the Battle Report of the "Orcs vs Chaos Dwarves vs Goblins/Minotaurs" battle from the Orcs side of things.


The three armies approached the lightly forested area each moving forward to the place in a small copse of trees that held long forgotten magic gems.


The Minotaurs and Orcs reach the trees first with the Chaos Dwarves taking their time due to.....motivational issues, and a bad starting set of activation rolls.

The Minotaurs and Goblins begin to search the trees but come up empty handed as the Orcs arrive on the scene and begin their own search of the area.

Finally an Orc finds a magic gem and begins to move away hoping to get off the field, likewise the goblin horde also finds and begins to move some gems.  Finally the Chaos Dwarves arrive to attack the flank of the Orcs and Goblins.  A small skirmish occurs with the Orcs and a Chaos Dwarf is knocked down.

Finally the Orcs manage to kill one of the Dwarves, but as they do the hulk of an Ogre shows up and smashes the victorious Orc to the ground, at the same time a second Dwarf appears and the combined effort of him and his leader another Orc is brought to the ground and killed.

The Orc Chieftain falls under the combined attacks of Dwarves and Goblins, but he is tough and despite being pressed down and kept off balance maintains his position.  In the north the second unit of flanking Dwarves has begun to push through the wall of Goblins.

The Ogre and Chaos Dwarves push in and attack the Orc with the gem knocking him down in a mad melee to gain control of the magic rock.  In the trees the Orc swordsmen engage with the Minotaurs in an effort to claim the stones for their shamans.

The Orcs in the trees are no match for the larger, stronger Minotaurs and are pushed down and back in the frenzy of battle.  The Orc Chieftan stays strong and despite overwhelming odds stands up madly slashing with his axe at the 4 opponents trying to bring him down.

In the north the goblins hold their own, knocking down the chaos dwarf and begin to swarm him.
The swarm of Goblins proves too much and while fallen two of the goblins swarm over the dwarf while a third ends his life with a dagger.
 
The Orcs in the trees fair horrible and another Orc falls gored by the Minotaurs before the last Orc Swordsman runs for his life.  The Great Orc Chieftan makes his last stand as the final three enemies he is engaging finally deliver more damage than he can stand and forces him to the ground for the last time.
 
The final Orc recovers his wits and turns to meet his final doom as a Chaos dwarf and their Hobgoblin allies show up to end his life.
As killing swept the battlefield the main engagements took place between the Orcs and Chaos Dwarves leaving a fairly open corridor for the Goblins and Minotaurs to grab and escape with the magic gems.

Wednesday, October 21, 2015

FallCon 2015: 15mm Tomorrow's War. RESD vs Cyber Threat

This was a refresher game using two equivalent sides.  TL2, standard troops

Rigel II:  New Mohi

A fledgling colony established on the edge of known space.  Colonists establishing the first settlements stumbled across an artifact of unknown origin and technology.  It's importance was clear and a FTL message dispatch was sent to Terra.

A small force of the Royal Exo-planetary Strike and Defense was sent to hold the position.  Unfortunately the transmission was intercepted by the Cyber Threat, a race of intelligent robots who have decided the tech should belong to them.

The small unit of RESD troopers was divided into 3 fire teams.  One held the artifacts position while 2 other fire teams went out to scout the area to prevent unknown attacks.

When the Cyber Threat appeared the main colony was protected by a small force, knowing they had to survive while three squads of machines approached out of the mist.
The Colony of New Mohi, a new small colony on the fringes of human space.

RESD team 1 holds the area around the artifact while the Cyber Threat approaches the compound.

RESD Team 1 knows Team 2 and Team 3 are scheduled to return, and so hold out and stay mostly out of site while the robots approach.

RESD Team 1 takes cover expecting to be caught in the fire of the Cyber Threat soon.  On the left side RESD Team 2 returns from scouting and approached through the forest, causing the Cyber Threat to funnel their forces more down throat of the compound.  Unfortunately heavy cover makes firing lanes rare and hard to come by.

As expected the central element of the Cyber Threat comes around the corner of a colony building and opens up on Team 1.  Team 1 presses into cover and begins to return fire as one of their riflemen fall.  In the chaos their fire impacts uselessly against the compound walls, missing the robots.

During the firefight the reinforcing element of RESD Team 2 moves forward to the edge of the forest in order to be able to lay down fire, trying to hold the second element of the Cyber Threat at bay.  On the right side the robots see an opening and dash between the tanker and main colony building hoping to out flank the RESD and catch team 1 in a cross fire.

Just when it looks very bad for the humans, RESD Team 3 returns through the forest on the right, forcing the Cyber Threat to hold position and re-evaluate.

As the fire fight rages across the main colony road, the left element of Cyber Threat dashes across to lend support to their central element.

RESD Team 2 moves up and opens fire on the Cyber Threat central element with Team 1.  Their plasma rifles are strike home and knock several of the robots down, damaging some severely.
Aftermath of the firefight, 2 severly damaged robots, and one lightly damaged.  The fire from the robots falls around the troops but does no damage, the massive damage pins the robots where they are for now.

As battles ebb and flow the left element of the Cyber Threat moves up into a firing position in the trees, their combined fire down on the RESD this time cause massive damage knocking troopers into the mud.  One stays down permanently. One takes serious damage, his armor holed through the lower body.  On the right the Cyber Threat enters the main colony complex hoping to use the cover of the door to finally dislodge RESD Team 1 from the artifact's building.

From their position in the building the Cyber Threat right element exchanges fire with RESD team one, ammunition strikes true on both sides, as warriors from both factions are knocked to the ground.  RESD Team 3 moves along the forest edge and sets up a firing line, preventing the right element from crossing to the artifact.

Team 1 and the Right Cyber Threat feeling their firefight heating up and their companions knocked down with serious injuries continue to take as much cover as they can and continue to fire across the road at each other.  The damaged central element falls back, to remove the damaged units freeing them to fight more effectively.  Their left element comes down the hill and enters a colony building

The battle continues to rage.  A war of attrition on both sides.  At the point the artifact is still in the human's control, and barring a stroke of bad luck, both sides will continue to wear themselves down little by little until the colony is left a smoking battlefield with not enough men or machines to retrieve the artifact.............